GreenKeeper RECON
Installation Guide and Technical Support

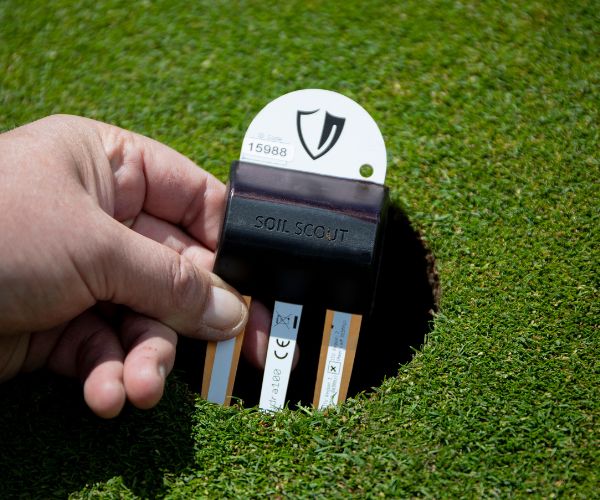
Data collection and interpretation is at the heart of the predictive models driving GreenKeeper App. Connecting to various autonomous sensors increases the quantity and quality of data within GreenKeeper. Compatible hardware includes in-ground soil moisture sensors from SPIIO and Soil Scout and our own GreenKeeper RECON sensor suite. This page contains information required to install, connect, and troubleshoot sensors that connect with GreenKeeper App.
Jump to Specific Products:

RECON wX Station and Rainbucket Overview
GreenKeeper RECON wX Stations and Satellite Rainbuckets connect your local weather data directly to GreenKeeper App’s agronomic models. This page describes the various systems, contains installation instructions and videos, and has helpful troubleshooting tips for these weather monitoring devices.
System Description and Limitations
The wX Station measures air temperature, pressure and relative humidity, wind speed and direction, and solar radiation every 15 minutes. Rainfall is captured with a tipping bucket rain gauge on the wX.
The wX Station is free standing and powered with a solar panel and lithium-ion battery. Data is shared with GreenKeeper via a cellular connection.
A $350 annual API fee covers cellular service. It is added to your GreenKeeper subscription renewal invoice. GreenKeeper Pro Vision customers received one API cellular connection included within their subscription.
The default cellular provider is Verizon. If your desired wX placement location has poor Verizon service, a non-verizon wX is available upon request. The wX cannot connect via WIFI service.
The Satellite Rainbuckets connects to the nearest wX Station via LoRa wireless technology. Up to 50 LoRa devices can connect to each wX station. This eliminates the need for additional cellular connection fees, but a course needs one wX for the rainbuckets to share their data with GreenKeeper App.
The maximum recommended distance from a rain bucket to the nearest wX station is 700 yards, although some sites have connected up to 1000 yards depending on line-of-sight and other sources of interference.
The satellite rainbuckets are powered by two lithium-ion AA batteries that last 8-18 months, depending on precipitation frequency.
Included System Components
The wX Station and Statellite Rainbucket include all installation parts for quick installation.
Included Components:
wX Station
- Cellular Weather Front Gateway
- Weather Station (temperature, pressure, relative humidity, dew point, tipping bucket rain gauge, and solar radiation)
- Anemometer (wind speed and direction)
- Solar Panel
- Robust metal tripod
- 3 helical anchors
- Miscellaneous small tools and zip ties
Satellite Rainbucket
- Tipping bucket rain gauge
- 2 AA lithium ion batteries
- Mounting pole
Choosing Weather Sensor Locations
It is not a trivial decision to locate your weather stations devices.
The wX Station needs to be positioned with adequate cell phone reception. Use the bars on your cell phone to ensure sufficient data coverage. Most of our wX Stations use the Verizon cellular network. If Verizon coverage is weak, request a global (AT&T/T-Mobile) wX.
The wX Stations are not WIFI compatible and require cellular connections for data sharing with GreenKeeper. The wX stations are only available for customers in the United States.
Place a wX over representative turf and in full sunlight. For accuracy wind reporting, keep the wX 50 yards away large trees or buildings. Don’t place the wX in wooded areas or in a prairie with different grass species. Flat mowed rough areas are recommended. Be wary of irrigation head coverage that could be captured by the rain gauge.
The Satellite Rainbuckets connect to the nearest wX to share their rainfall data. The need to be placed within 700 yards of a wX station for a sufficient LoRa wireless connection. Terrain, trees, buildings and other interfering structures can limit this range. Some customers have reported 1000+ yard connectivity if the rainbucket or wX have clear line-of-sight or are place on a hill.
Connect to GreenKeeper App via QR Label
Before installing a wX Station or Satellite Rainbucket in the field, connect the device to GreenKeeper App.
It’s easier to unbox, pre-assemble, and connect devices to GreenKeeper indoors before installation in the field.
Locate the QR code on the side of the white communication gateway or within the rainbucket. The device ID is a ten digit code located below the QR code. They typically start “0x0_______”.
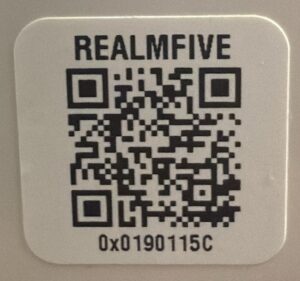
NOTE: The QR code may take up to the manufacturer’s website. You DO NOT need to create a Realm Five Account. Instead log into the GreenKeeper Homepage.
On the GreenKeeper homepage, click the gear button in the top right corner of the Weather Tile to enter the ten digit code from the wX and Rainbucket into GreenKeeper.
After entering the code, you name the device in GreenKeeper and select the wX to make it the primary source of weather data within GreenKeeper.
Assembly and Installation
Assembly and Installation
Both the wX Stations and Satellite Rainbuckets are simple to install at your course.
wX Station and Tripod
Suggested Tools
- Adjustable Wrenches/Socket Set
- Torpedo level
- Utility knife or side
- Ladder
- Battery Powered Hammer Drill (recommended)
- Marking paint or flags (recommended)
- HEX set screw wrench (included with zip tie in packaging)
0) Pre-Assemble in the Shop
It’s easiest to pre-assemble several station components in the shop: (1) Attach the wind speed cups to the anemometer by tightening the hex set screw with included allen wrench, (2) carefully twist the black shield to expose the tipping bucket and cut the zip tie that secures the tipping bucket during shipping, (3) reinstall cover, small black screen, and metal bird rods.
Don’t Plug In the Solar Panel until the wX is mounted outside
1) Level the tripod
Position the tripod on relatively flat soil, mark the leg locations with flags or paint, use a hammer drill to screw mounting helical anchors into the ground, ensure vertical mounting pole is plumb and secure.
2) Install solar panel
Position the solar panel on the pole roughly 12 inches below the bottom location of the wX (ideally 5 feet above the ground). Secure with included pole clamp bolt, washers and metal nuts.
Solar panel should facing directly south. Use a small compass or cell phone compass app to identify magnetic (or true) south.
3) Mount and level wX and anemometer
Use the provided mounting hardware to attach the wX station and anemometer to the post. Use the bubble levels inside the rain collector and near the solar sensor to ensure that they are level. Small imperfections can adversly affect the data accuracy.
Suggested mounting height for monitoring turf weather is approximately 6 to 10 feet above the ground.
Be sure the anemometer is pointed north (opposite of the solar panel direction) to obtain an accuracy wind direction.
4) Plug the solar panel into the Weather Front Gateway
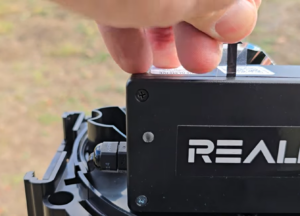
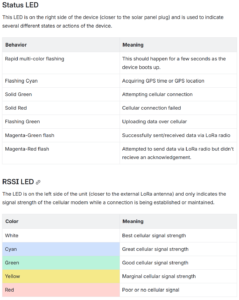
Carefully insert the plug in the correct direction (black tab facing out) to the bottom of the cellular gateway. The indicator lights will turn on and the system will start to connect to the internet. Weather data will appear in GreenKeeper within the next hour or two. Refer the the “Maintenance and Troubleshooting” section below for a description of the light behaviors.
Satellite Rainbucket Installtion
0) Pre-assembe the bracket, bird deflector rod, remove security zip tie on the tipping bucket rain gauge.
1) Drive the metal post securely into the ground and ensure it is level. It is recommended to install and activate the wX before installing the Satellite Rainbucket at your site.
2) Mount the rainbucket to the post and adjust for plumb/level
3) Remove the black housing to pull the clear battery plastic from the battery box. This will awaken the rainbucket and it will search for the nearest wX station to connect with.
Maintenance and Troubleshooting
The wX station and Satellite Rainbucket are low maintenance. Make sure there aren’t obstructions like leaves or other debris in the rainbucket collection cone and that the wX (and solar sensor) are level. Replace the Satellite Rainbucket AA batteries annually or whenever rainfall quantities are not reporting on GreenKeeper App.
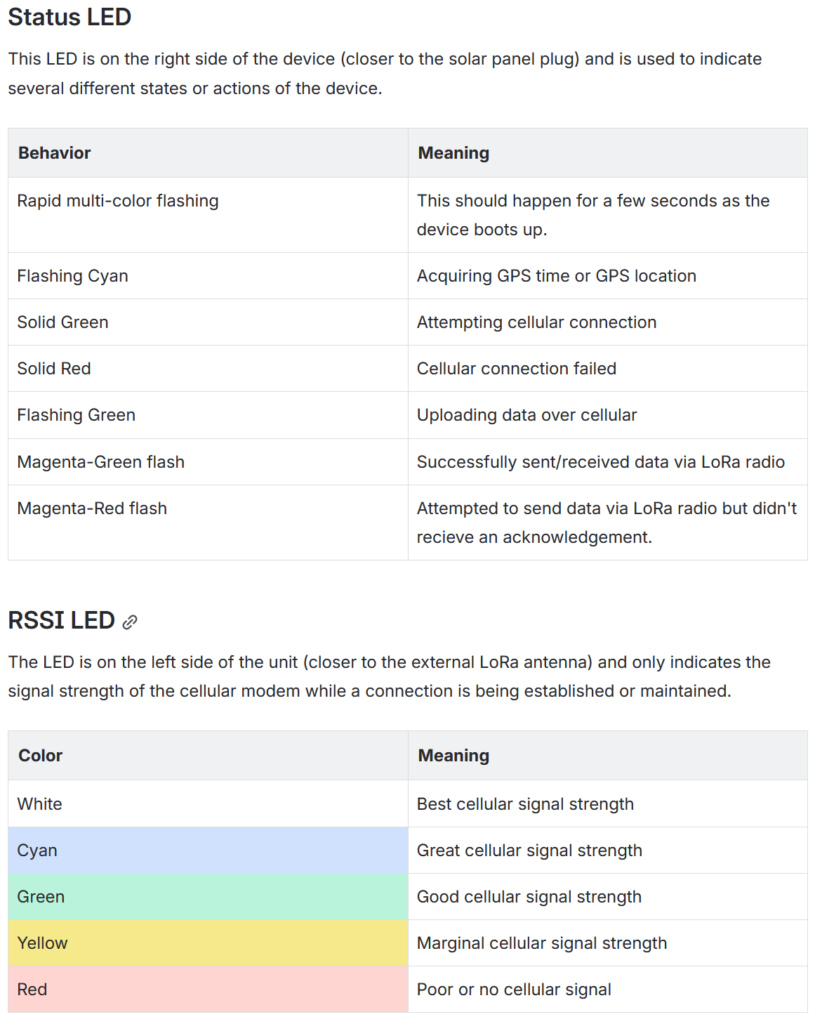
There are indicator lights on the Weather Front Gateway that can help detect issues with the cellular modem within the wX Station.

Turf Vision System
The Turf Vision System is a revolutionary active turfgrass sensor system. It is design to measure metrics of turfgrass health via light reflectance with every of a mower. These data are then paired with GreenKeeper machine-learn to detect and classify different turfgrass stresses or conditions.
The heart of the Turf Vision System is the aX autonomous datalogger and GPS receiver and the rX reflectance sensor. When paired together, the Turf Vision System can collect tens of thousands of measurements while your staff is mowing.
After the mowers are finished, the aX logger will automatically turn off the rX sensor, connect to your shop WIFI network and upload the data to GreenKeeper. The updated map layer can then be viewed within minutes of receiving the data via our GreenKeeper CIS plateform.
General Overview
GreenKeeper Turf Vision is an advanced turf monitoring system that leverages mobile sensor technology, GPS positioning, and machine learning to map and classify turf conditions across your property. By integrating real-time sensor data with agronomic models, Turf Vision produces intuitive visualizations that highlight turf stress, guide hand-watering, and validate management decisions. Designed for seamless operation, it empowers turf managers to make faster, more informed, and more consistent decisions.
At the heart of the system is the rX sensor, which uses an internal modulated light source to measure key indicators of turf health—such as leaf biomass, nitrogen status, and early signs of stress. Unlike passive sensors that depend on ambient sunlight, the rX’s active light source enables consistent, repeatable readings regardless of time of day or weather conditions.
To further improve accuracy, the Turf Vision system is mounted behind a mower rather than on a drone or front-mounted rig. This unique configuration eliminates issues caused by bidirectional reflectance—the striping effect created by mowing direction—which can interfere with sensor readings. As the mower cuts, it also reorients leaf blades and removes dew, creating a uniform canopy and enhancing data reliability.
The aX autonomous datalogger is the control center of the Turf Vision system. This compact device includes a GPS receiver, 2.4 GHz Wi-Fi modem, and onboard memory, enabling it to capture tens of thousands of data points per mowing pass. The aX automatically wakes when the mower starts, powers the rX sensor once the mower leaves the shop area, and syncs collected data to the shop’s Wi-Fi network upon return. All captured data is then automatically processed and visualized within GreenKeeper CIS for immediate analysis.
Included System Components
The Turf Vision System includes the components that are described below. A mower mount is available for purchase. It is optimized for mowers with round rear bumpers. Many courses prefer to create their own custom brackets. Specific mounting recommendations are found below.
Included Components:
- aX
- rX
Creating aX Configuration Files
The aX logger needs to be configured to your individual course or facility to run autonomously.
- CLIENT.CFG
- WIFI.CFG
- GPS.CFG
The client file contains information about the course and the name of the piece of equipment supporting the system. The Wi-Fi file contains the shop’s 2.4Ghz SSID and password. The GPS defines the location of the shop, sets a Wi-Fi geofence to trigger data upload, and the shop yard geofence to start and stop collecting data.
The three files can be downloaded from GreenKeeper as a ZIP file. Users will then:
- Connect the aX to their PC (note: Mac computers are not recommended).
- Use File Explorer to open the aX memory folder. It will appear like a mass memory storage device (i.e. USB thumb drive).
- Extract the three configuration files directly into this aX by right-clicking the ZIP folder for the specific aX and clicking “Extract All…” and selecting the aX location.
- Eject the aX memory and unplug the aX from your PC.
Note: The names of these three files need to be exactly correct. If they have changed for any reason, rename the files to be correct. Common errors include intentionally renaming a file (i.e. Mower 1 Client.GFC) or Windows will add a number during a download/extraction (i.e. CLIENT(1).CFG).
Assembly and Installation
Assembly and Installation
Both the wX Stations and Statellite Rainbuckets are simple to install at your course.
wX Station and Tripod
Suggested Tools
- Adjustable Wrenches/Socket Set
- Torpedo level
- Utility knife or side
- Ladder
- Battery Powered Hammer Drill (recommended)
- Marking paint or flags (recommended)
- HEX set screw wrench (included with zip tie in packaging)
0) Pre-Assemble in the Shop
It’s easiest to pre-assemble several station components in the shop: (1) Attach the wind speed cups to the anemometer by tightening the hex set screw with included allen wrench, (2) carefully twist the black shield to expose the tipping bucket and cut the zip tie that secures the tipping bucket during shipping, (3) reinstall cover, small black screen, and metal bird rods.
Don’t Plug In the Solar Panel until the wX is mounted outside
1) Level the tripod
Position the tripod on relatively flat soil, mark the leg locations with flags or paint, use a hammer drill to screw mounting helical anchors into the ground, ensure vertical mounting pole is plumb and secure.
2) Install solar panel
Position the solar panel on the pole roughly 12 inches below the bottom location of the wX (ideally 5 feet above the ground). Secure with included pole clamp bolt, washers and metal nuts.
Solar panel should facing directly south. Use a small compass or cell phone compass app to indentify magnetic (or true) south.
3) Mount and level wX and anemometer
Use the provided mounting hardware to attach the wX station and anemometer to the post. Use the bubble levels inside the rain collector and near the solar sensor to ensure that they are level. Small imperfections can adversly affect the data accuracy.
Suggested mounting height for monitoring turf weather is approximately 6 to 10 feet above the ground.
Be sure the anemometer is pointed north (opposite of the solar panel direction) to obtain an accuracy wind direction.
4) Plug the solar panel into the Weather Front Gateway
Carefully insert the plug in the correct direction (black tab facing out) to the bottom of the cellular gateway. The indicator lights will turn on and the system will start to connect to the internet. Weather data will appear in GreenKeeper within the next hour or two. Refer the the “Maintenance and Troubleshooting” section below for a description of the light behaviors.
Satellite Rainbucket Installtion
0) Pre-assembe the bracket, bird deflector rod, remove security zip tie on the tipping bucket rain gauge.
1) Drive the metal post securely into the ground and ensure it is level. It is recommended to install and activate the wX before installing the Satellite Rainbucket at your site.
2) Mount the rainbucket to the post and adjust for plumb/level
3) Remove the black housing to pull the clear battery plastic from the battery box. This will awaken the rainbucket and it will search for the nearest wX station to connect with.
Maintenance and Troubleshooting
The wX station and Satellite Rainbucket are low maintenance. Make sure there aren’t obstructions like leaves or other debris in the rainbucket collection cone and that the wX (and solar sensor) are level. Replace the Satellite Rainbucket AA batteries annually or whenever rainfall quantities are not reporting on GreenKeeper App.
There are indicator lights on the Weather Front Gateway that can help detect issues with the cellular modeum within the wX Station.
General Overview
GreenKeeper Turf Vision is an advanced turf monitoring system that leverages mobile sensor technology, GPS positioning, and machine learning to map and classify turf conditions across your property. By integrating real-time sensor data with agronomic models, Turf Vision produces intuitive visualizations that highlight turf stress, guide hand-watering, and validate management decisions. Designed for seamless operation, it empowers turf managers to make faster, more informed, and more consistent decisions.
At the heart of the system is the rX sensor, which uses an internal modulated light source to measure key indicators of turf health—such as leaf biomass, nitrogen status, and early signs of stress. Unlike passive sensors that depend on ambient sunlight, the rX’s active light source enables consistent, repeatable readings regardless of time of day or weather conditions.
To further improve accuracy, the Turf Vision system is mounted behind a mower rather than on a drone or front-mounted rig. This unique configuration eliminates issues caused by bidirectional reflectance—the striping effect created by mowing direction—which can interfere with sensor readings. As the mower cuts, it also reorients leaf blades and removes dew, creating a uniform canopy and enhancing data reliability.
The aX autonomous datalogger is the control center of the Turf Vision system. This compact device includes a GPS receiver, 2.4 GHz Wi-Fi modem, and onboard memory, enabling it to capture tens of thousands of data points per mowing pass. The aX automatically wakes when the mower starts, powers the rX sensor once the mower leaves the shop area, and syncs collected data to the shop’s Wi-Fi network upon return. All captured data is then automatically processed and visualized within GreenKeeper CIS for immediate analysis.
Components and Installation
Your content goes here. Edit or remove this text inline or in the module Content settings. You can also style every aspect of this content in the module Design settings and even apply custom CSS to this text in the module Advanced settings.
Normal Operation
Your content goes here. Edit or remove this text inline or in the module Content settings. You can also style every aspect of this content in the module Design settings and even apply custom CSS to this text in the module Advanced settings.
Troubleshooting
Information about
Ground Truthing Data
Your content goes here. Edit or remove this text inline or in the module Content settings. You can also style every aspect of this content in the module Design settings and even apply custom CSS to this text in the module Advanced settings.
Your Title Goes Here
Your content goes here. Edit or remove this text inline or in the module Content settings. You can also style every aspect of this content in the module Design settings and even apply custom CSS to this text in the module Advanced settings.
In-Ground Soil Sensor Partner Integrations
GreenKeeper App is committed to integrating with in-ground soil moisture sensor system that are commonly used by turfgrass managers. While we do not directly sell or support these sensor, below you’ll find information about connecting with GreenKeeper and links to support resources from the different manufacturers.
Connecting Your Sensors to GreenKeeper
Your content goes here. Edit or remove this text inline or in the module Content settings. You can also style every aspect of this content in the module Design settings and even apply custom CSS to this text in the module Advanced settings.
SPIIO Support Resources
Your content goes here. Edit or remove this text inline or in the module Content settings. You can also style every aspect of this content in the module Design settings and even apply custom CSS to this text in the module Advanced settings.
Soil Scout Support Resources
Your content goes here. Edit or remove this text inline or in the module Content settings. You can also style every aspect of this content in the module Design settings and even apply custom CSS to this text in the module Advanced settings.